.svg)
.svg)
.avif)

.svg)


.svg)
.png)
.png)
.jpg)
Our Apps Have Driven
5X AOV | 2X Conversions | $30M+ Additional Revenue
5X AOV | 2X Conversions | $30M+ Additional Revenue
.svg)

5.0 (900+ Reviews)


Shopify Apps


.svg)

As a Shopify merchant, quantity breaks are one of the most straightforward ways to increase average order value (AOV) and encourage customers to buy in bulk.In this guide, you will learn exactly how to set up quantity breaks on Shopify, both with Shopify’s native discount features and with apps, plus how to price and promote these offers so they actually get used.

Quantity breaks are a form of tiered pricing, where the discount increases as the customer buys more of an item.
For example, let's say you're selling a popular product for $20, you could set up a quanity break on your Shopify store as follows:
Customers see that buying a higher quantity gives them a better per‑unit price, which nudges them to increase their order size.This works because shoppers are driven by perceived value: when they see clear savings for buying more, they are more likely to choose a higher tier.
There are two main ways to create quantity breaks on Shopify:
The native option is free and works well for simpler setups, while apps are better if you want more advanced features or less manual maintenance.
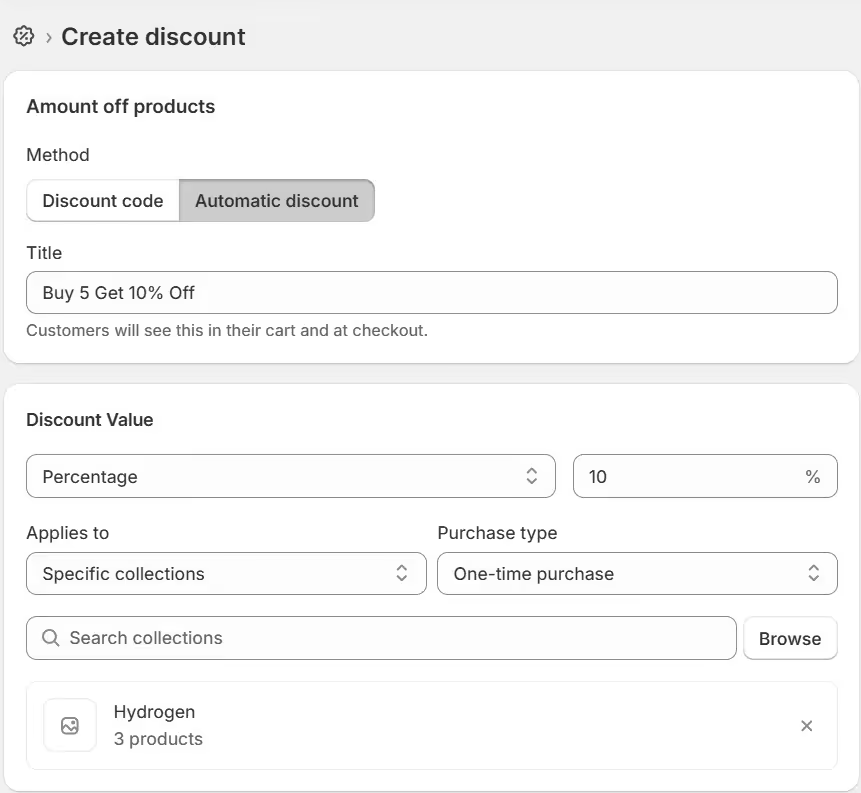
Shopify’s discount system does not have a single “quantity breaks” feature, but you can mimic it by creating one automatic or code discount per quantity tier.
For example, you might create one discount for “Buy 3, get 5% off” and another for “Buy 5, get 10% off”.
To offer multiple quantity breaks (for example 3, 5, and 10 units), repeat the process:
This native approach is quick to set up but becomes harder to manage if you have many products or complex tier structures.

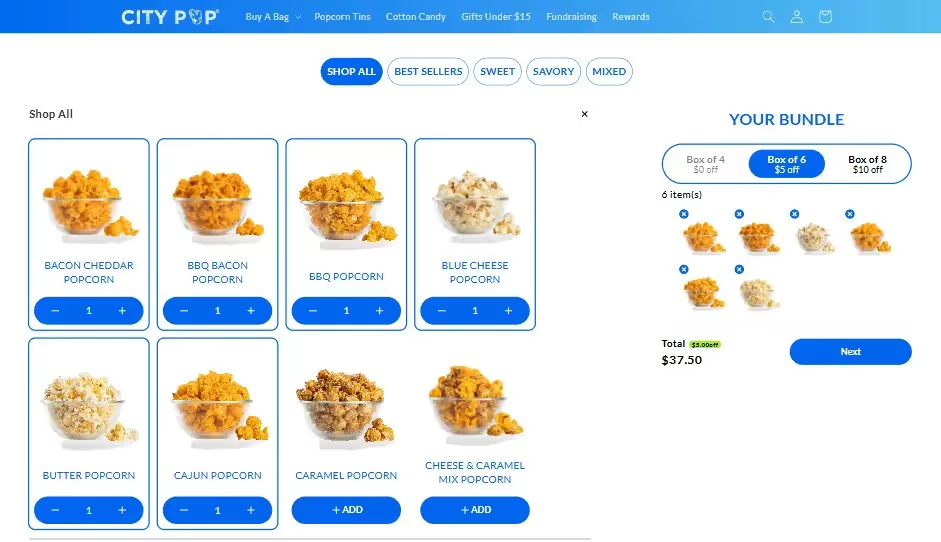
To create a more evolved quantity break on Shopify, apps can provide ready‑made widgets, easier configuration, and richer features such as mix‑and‑match discounts or collection‑wide rules.Below are three ways to set up quantity breaks using Skai Lama apps: Fly Bundles, Kite: Discount & Free Gift, and Easy Bundle Builder.
With Fly Bundles, you can create seamless quantity breaks that integrate smoothly with product bundles, giving your customers even more incentive to purchase larger quantities.
Here's a guide for creating quantity breaks on Shopify using Fly Bundles
Step 1: Install the Fly Bundles App
Step 2: Create a New Bundle Offer
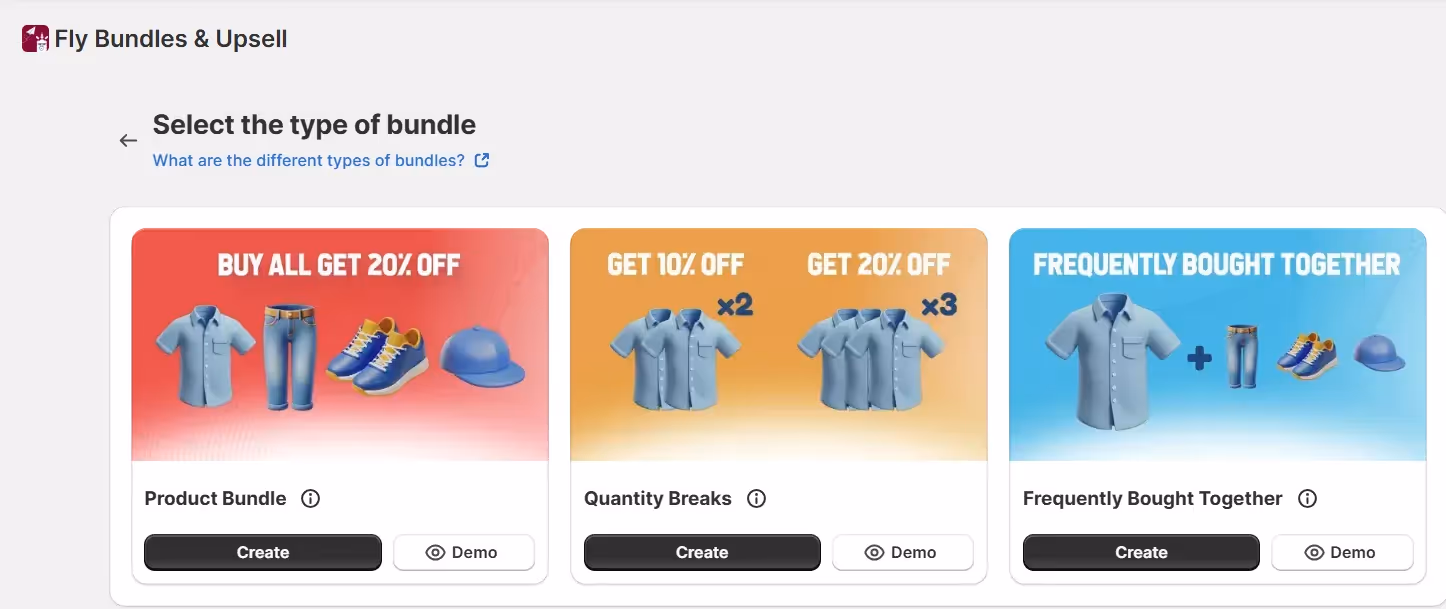
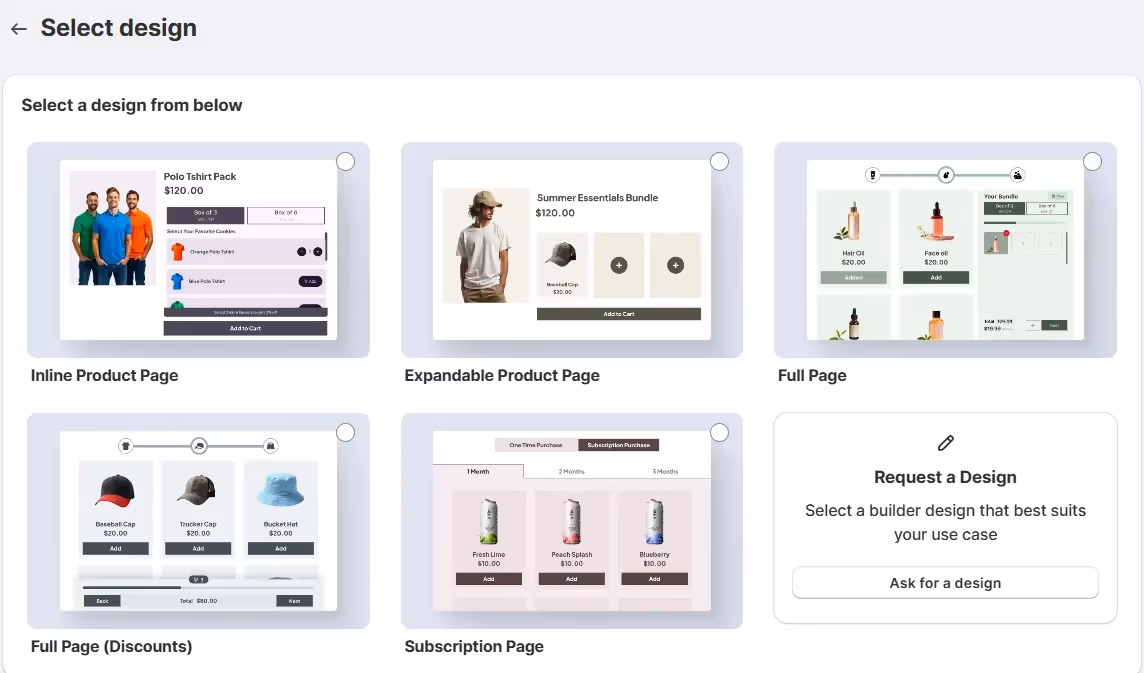
Step 3: Choose a Template
Step 4: Configure Offer Setup
Once you click on 'Select Template', you will be directed to the bundle setup. The first step is to add the product to which you want to apply your volume discount. You can choose to apply the volume discount in the following ways:
Offer visible on:
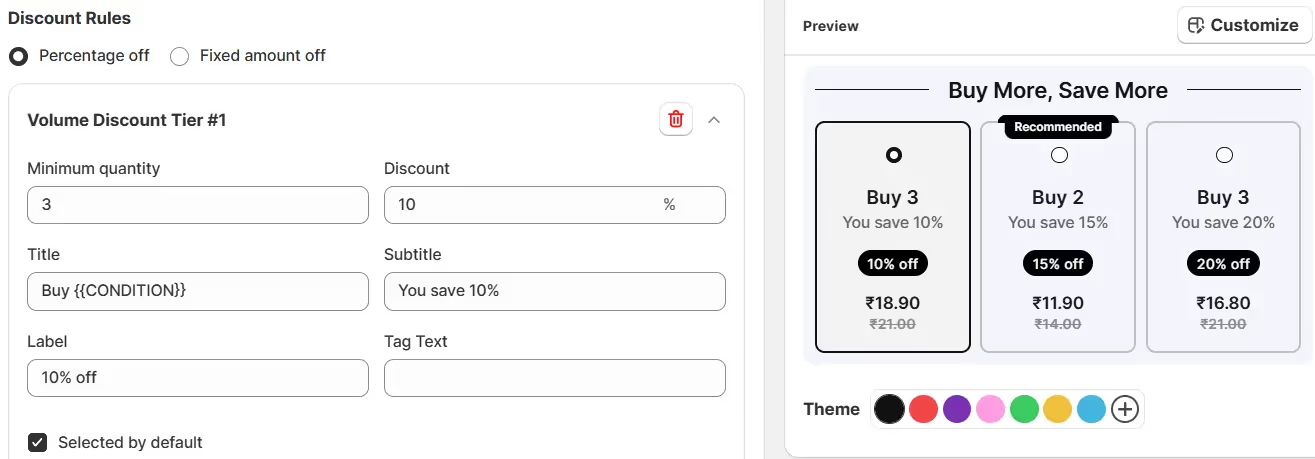
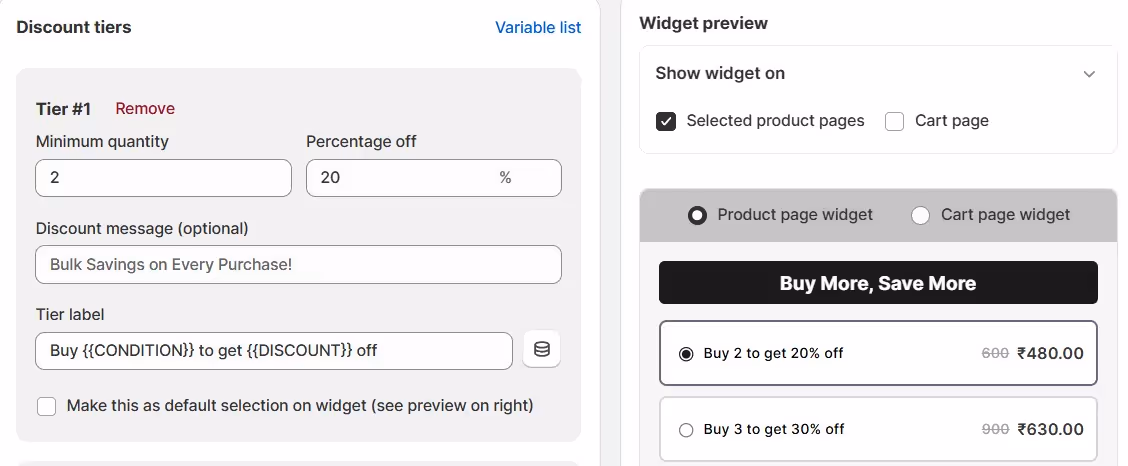
Step 5: Define Discount Rules (Volume Discount Tiers)
Step 6: Configure Discount Settings
Step 7: Define Display Settings
Step 8: Configure Additional Settings
Free gift label: If you've added a free gift, you can customize the label for it with the following options:
Step 9: Save Your Quantity Break
See this guide for a detailed setup on how to create Quantity Breaks with Fly Bundles
Step 1. Install Kite: Discount & Free Gift App:
Step 2. Create a New Promotion:
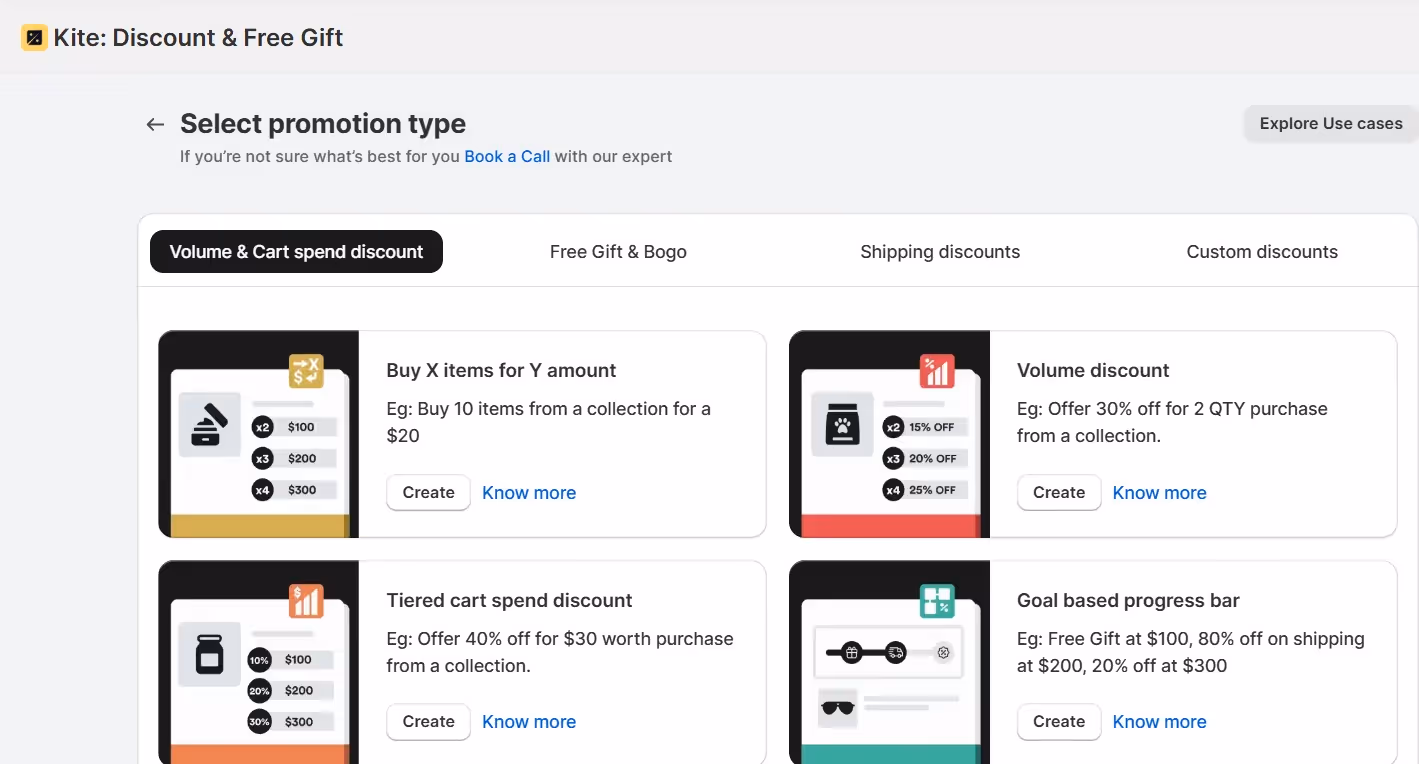
Select “Create New Promotion” button. Then, select Volume Discount and click on 'create'.
Step 3. Set Promotion Name
Step 4. Select Products for the Discount:
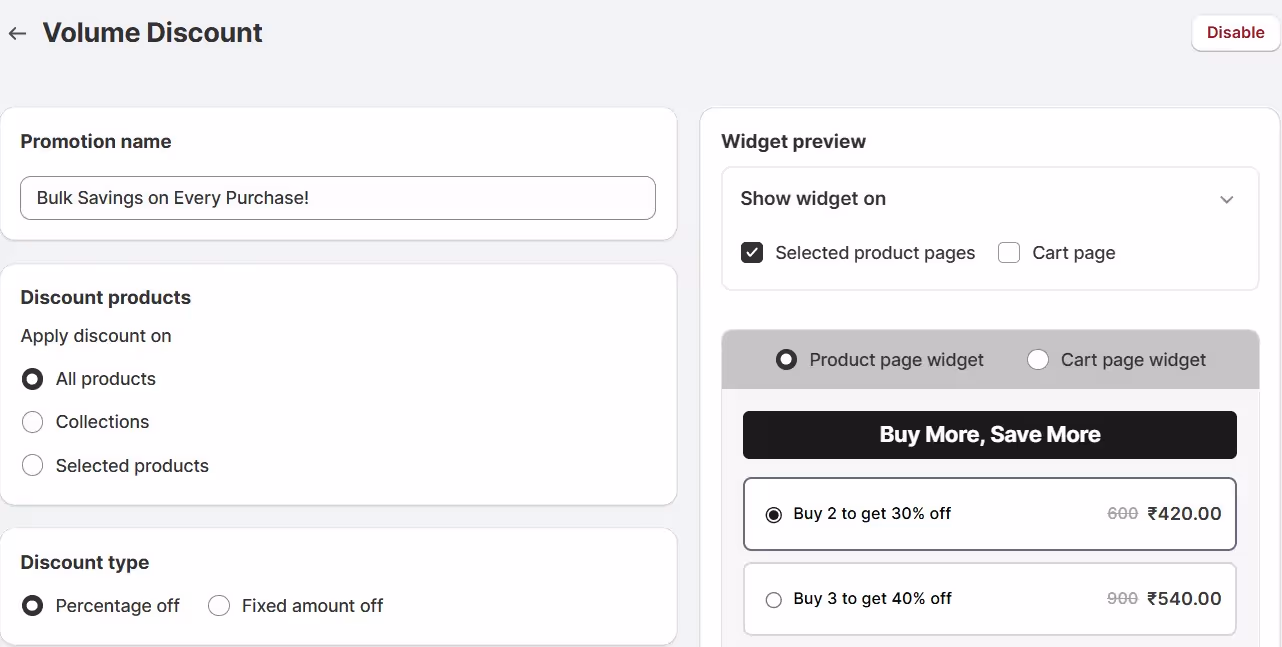
Apply the discount to all products, a specific collection, or selected products
Step 5: Pick a Discount Type:
Choose either a Percentage Discount or a Fixed Amount.
Step 6: Define How the Discount is Applied
Decide if the discount applies to individual products, a selected collection, or a specific product range.
Step 7: Set Discount Tiers:
Create different tiers for your discount, like:
Step 8: Combine with Other Discounts:
If you want, you can combine this with other ongoing product or order discounts in your store.
Step 9: You can set up the promotion in multiple languages, customize how it appears on the Cart or Product Page, schedule it for specific dates, and apply the discount either manually or automatically based on your preferenc
Step 10: Set Customer Eligibility:
Decide who’s eligible for the discount. You can choose based on customer tags, whether the customer is logged in, or their location.
Step 11. Save Your Settings:
Once you’ve configured everything, you can save your settings. If you want, you can also tweak the widget’s look and feel.
Step 12. Test and Activate:
Before going live, make sure the app embed is enabled, so the discount will work properly. Once it’s set, hit Save, and you’re good to go!
1. Install Easy Bundles:
Go to the Shopify App Store, search for Easy Bundle Builder, and install it.
2. Select a Template:
For creating Quantity Breaks, you can select Inline Product Page or Full Page Template.
3. Start with Category Setup:
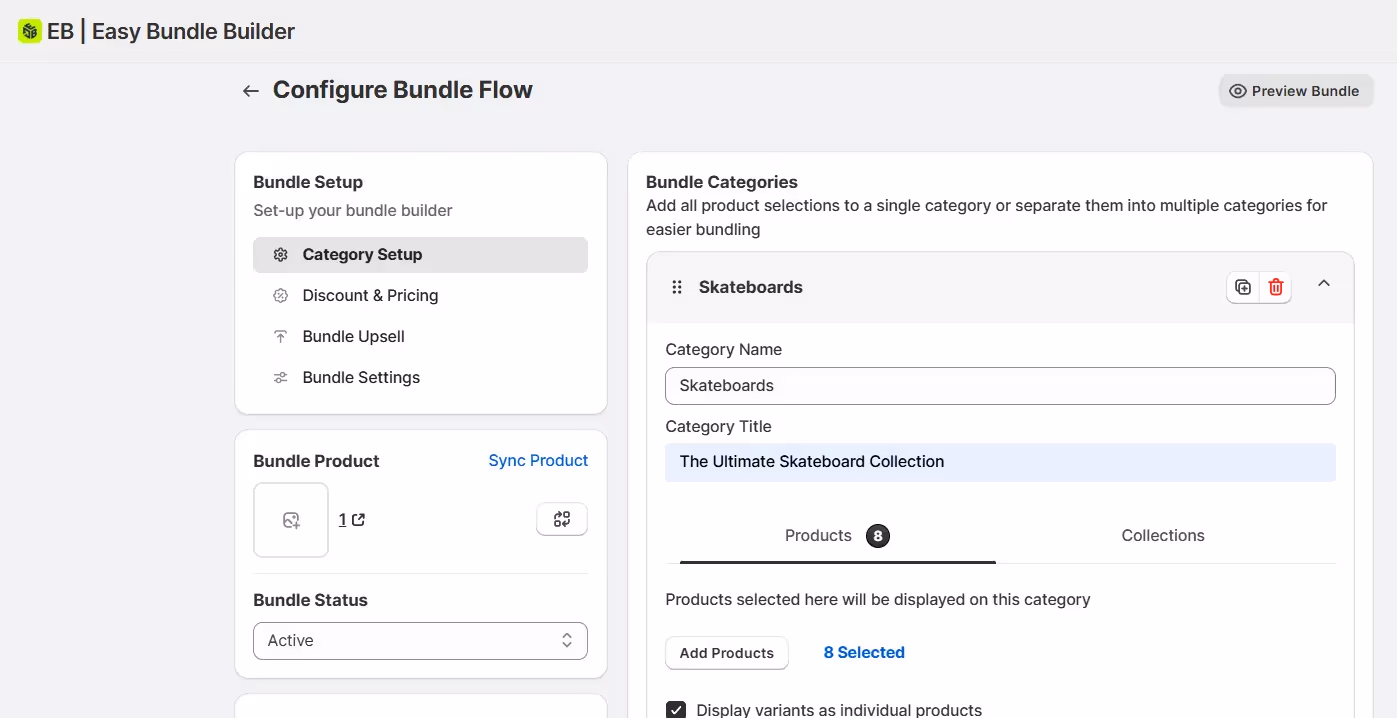
4. Set Category Rules:
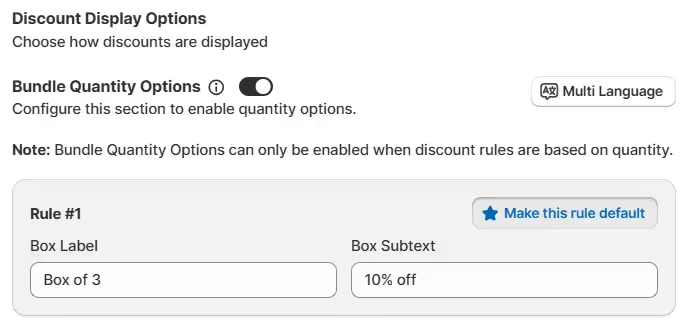
category of your bundle, you can define rules to control product selection and customer progression. Set conditions based on the quantity or total amount of products that must be added to that category for it to be considered valid.5. Set Discount & Pricing:
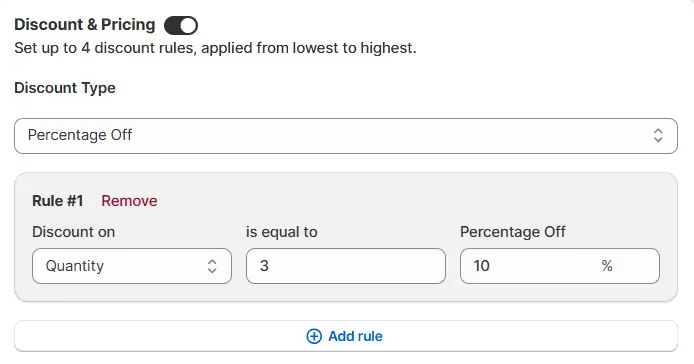
Choose how you'd like to offer discounts within your bundle. You can select from:
Bundle Quantity Options:
Discount Messaging:
Here, you can edit how discount messages appear above the subtotal.
6. Configure Bundle Upsell:
You can toggle the Product Page Bundle Upsell Widgets switch to activate upsells on product pages.
If you have a product page bundle, you can embed the bundle builder block directly on individual product pages to create an upsell opportunity
7. Bundle Settings:
8. Preview and Finalize:
Quantity breaks tap into several powerful psychological triggers:
When your tiers and messages clearly show these savings, quantity breaks feel natural and beneficial, not pushy.
Implementing Shopify quantity breaks on your store comes with several key benefits that can directly contribute to your business's success.
The most immediate benefit of quantity breaks is the increase in average order value (AOV). Customers are encouraged to buy more to unlock better pricing, which means they’re spending more money per transaction.
Quantity breaks incentivize customers to purchase more items in one go, leading to bulk purchases. This not only boosts your sales but also helps in building customer loyalty. Repeat customers who see the value in buying in larger quantities are likely to return for more purchases in the future.
By offering discounts for larger purchases, you can help move excess inventory. This increases inventory turnover, helping you keep stock fresh and avoid having products sit on shelves for too long.
When customers feel like they’re getting a great deal, they are more likely to feel satisfied with their purchase. Offering quantity breaks can lead to improved customer loyalty, as buyers may return to your store for similar offers.
While quantity breaks can boost sales, it's essential to ensure that your quantity break pricing remains profitable. Providing too large of a discount can reduce your profit margins.
1. Calculate Your Baseline - Start with your cost of goods sold (COGS) and minimum acceptable profit margin. If your COGS is $10 and you need 40% margin, never price below $14, even with quantity breaks.
2. Use Graduated Discounts - Create clear value progression with increasing savings:
The key is making each tier significantly more attractive than the last.
3. Test and Optimize - Monitor your average order value and profit margins. If customers aren't upgrading to higher tiers, increase the discount spread. If margins are too thin, reduce discount percentages.
Example: Suppose an online skincare store offers 5%, 10%, and 15% discounts for increasing quantities, but sales data shows most customers stick to the lowest tier. Adjusting to 10%, 20%, and 30% discounts could create a bigger incentive for customers to buy more, while still keeping profitability in check.
Effective quantity break pricing makes customers feel smart about buying more while ensuring your business remains profitable.
Once you've set up your Shopify quantity breaks, the real challenge lies in effectively promoting them to maximize their impact. Here are proven advanced strategies that successful Shopify merchants use to drive awareness and conversions for their quantity break offers.
Create urgency and clarity by showing customers exactly how much they save with each tier. Instead of just listing discounts, display the actual savings in dollar amounts:
Position your quantity break widgets in high-impact locations:
Implement progress bars showing customers how close they are to the next discount tier. This taps into the completion bias psychological principle, encouraging customers to "complete" their savings journey.
When customers abandon carts with single items, trigger emails highlighting quantity savings:
Email Subject: "You're just 2 items away from saving 15% on [Product Name]"
Email Content:
Create targeted email campaigns based on customer purchase history:
After a single-item purchase, send follow-up emails suggesting quantity purchases:
Create compelling social media content showing real customer savings:
Encourage customers to share their quantity break purchases:
Create content that positions quantity breaks as smart shopping:
The key to successful quantity break promotion is consistency, clear value communication, and strategic timing. Start with one or two strategies that align with your current marketing capabilities, measure their impact, and gradually expand your promotional efforts as you see results.
Follow the tutorial below to set up quantity breaks on your Shopify store:
To wrap things up, understanding how to create quantity breaks on Shopify is a powerful tool for boosting your sales and increasing your average order value (AOV). By implementing quantity breaks, you can incentivize customers to purchase more, leading to higher transaction values and stronger customer loyalty. Whether you opt for quantity break pricing using native Shopify features or turn to advanced apps like Fly Bundles, Kite: Discount & Free Gift, or Easy Bundles, the strategy is a proven way to grow your store.
I highly recommend tailoring quantity breaks to your products and customers, so you can maximize revenue while providing great value, creating a more rewarding shopping experience on your Shopify store.